

All Images And Text On This Site Are Copyright 1999-2001
by
Thomas D. Hill Jr.
| ABOUT KEIKO |
| WHAT'S NEW |
| THE KEIKO GALLERY |
| EQUIPMENT |
| IMAGE OF THE MONTH |
| ARTICLE OF THE MONTH |
One of the most confusing technqiues to the new digital photographer is the application of the Unsharp Mask (USM). First, the name of this mask adds to the confusion. The objective of the USM is to "sharpen" the image. The name, however, denotes the opposite feeling. I think the intent of the name is to mask the "unsharp" characteristics of your image. Yea, whatever. Its purpose is to make blurry images apparently sharper.
For reasons unknown to me, scanned slides or basic digital images will suffer from severe cases of the blurries. That means your digital image is probably a lot softer than it appears on your slide. Why is that? I haven't a clue. It's not related to the focus ability of the scanner. Mine--an Nikon LS-30--has an excellent auto-focus capability and it's confirmed from many slides that are scanned with incredible sharpness. It just seems that some slides look like they were scanned through a coke bottle. The blurriness is incredible. Well, there's a fix to this problem. I can't explain the whys but I can sure explain the fix. First, note there's a lot of complex math when it comes to manipulating images. There's no explaining it here. Just presume that through the years, several techniques have developed that seem to avoid the pitfalls and maximize the potentials of using these techniques.
The first thing to realize about USM filters is the experts say you can't save a blurry image. You won't get any more apparent sharpness than what the original slide possess. That means if your image is soft in the first place, it'll be soft after using your best techniques. While I generally agree there's not way to save an out of focus image, there are some times when a slightly soft image can be "saved" by judicious application of the USM filter. The second thing to remember is the saying "there's always too much of a good thing". That means there are limits to how much you can depend on USM filters. Too much application will lead to a halo'd covered, artifact imbeded image that will make any viewer cringe. Too much of a good thing is bad so think "subtle" when working with these filters. Finally, using these things are easy. Attention to detail and following a few "rules" will have you making awesome adjustments to your images and make you the talk of your envious friends. Let's get started...
Technqiue #1--apply USM filters after everything is done--after all the color tweaking, adjustments, contrast masks, layer applications, and flattening. Wait until after you've resized your image as desired. In fact, applying USM's should be the last thing done prior to printing or publishing the image. The reason for this technique? I think it has something to do with you never want to apply USM too many times to an image. None of the digital manipulation math is perfect so every change you make to an image degrades it oh so slightly. USM seems to be the biggest problem of them all. That means instead of applying the filter in the begining and compounding its problems through multiple manipulations, just wait until the bitter end when no other work has to happen and you'll by definition get the best image possible. We're talking very subtle problems here. Like I said--"attention to detail..." Technique #2--use the Unsharp Mask. Don't use those other, automatic sharpening filters. You loose too much control over something that needs very subtle application.
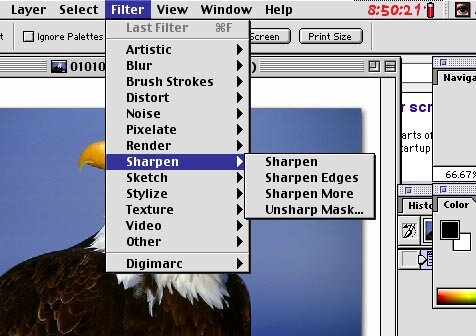
Like I said, USM gives the digital manipulator the most control among all the sharpen filters.
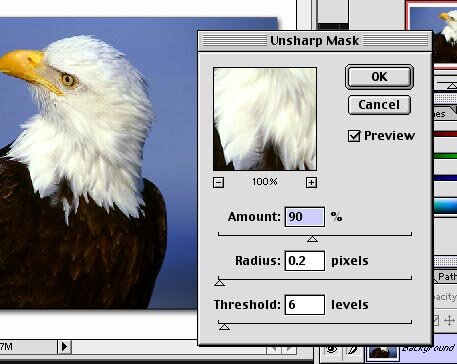
Like I mentioned before, you don't get something for nothing when using this filter. As I see it, USM increases contrast at the smallest detail. Essentially, it explores a region--sized by it's radius--then uses that information to increase the contrast to its neighbor pixels. Unfortunately, when there isn't much contrast USM tries to increase the contrast anyway. The result looks like you increased the apparent grain of the image. This extra grain in digital terms is called artifacts--the death of any decent digital image. How do you control this? Well, follow a few simple procedures.
First--set the threshold to zero and magnify your image to 100%. Don't ever work with a image that's less than 100% sized or you won't see how great or small your sharpening effect is. I realize most times you can't view the entire image when it's sized so large. So, pick a region that's important like the subject's eye to zoom in on.
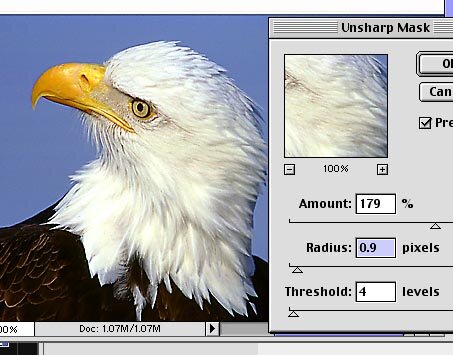
Second--set the radius between 0.5 and 1.0. Through experience, I found these settings work great for files that range between 1 meg and 25 meg. The smaller number works for the smaller file while the larger works with the larger file. The utility is definately subjective. That means you have to try things with each image to assess how things really work. I'll give you some pointers to get you in the right direction.
Third--After setting the radius, adjust the amount slider to get the desired effect. I spend a lot of time switching the preview box on and off to see how things are going. Depending on the file, the amount can be as large as 165% or as small as 100%. It depends on the image and how you set the radius. Try not to spend too much time looking at smooth backgrounds like skies because later you'll adjust the threshold to minimize the USM affect there.
Fourth--Now deal with those smooth backgrounds by adjusting the threshold slider. This is mostly an exercise in compromise which means raising the threshold may reduce most of the sharpening affect while eliminating those artifacts. You might have to give up a bit on artifacts to keep your image acceptably sharp. Like I mentioned before, this whole process is a compromise.
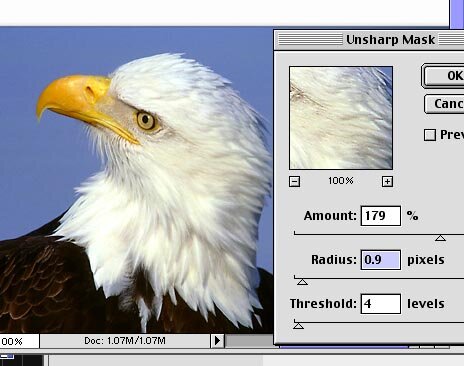
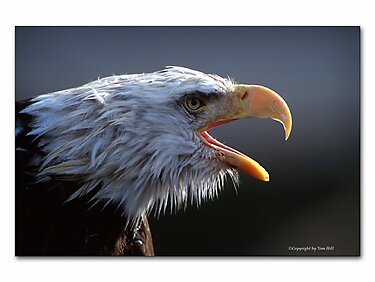
The image that heads this article was shot with my 500mm AF-S and TC-20e. The combo can be nortoriously soft. Some images can be tack sharp but others are inexplicably soft. The slide was unacceptable but by using these techniques I've saved the image for use on the web.
So, where does this leave you. Hopefully, you've a got a few more tools to use when trying to fix those soft digital images. USM isn't magic but with a bit of practice, you can save an otherwise soft image.
Cheers
Tom